Page 2 of 9

Re: Flickerfly's ORD Bot Hadron Build Log

PostPosted: Thu May 09, 2013 5:07 pm
by TLHarrell
Either your wife is really, really young looking, or you have a helper for putting together your project that will print a ton of Barbie stuff. Hope you've stocked up on pink filament. :lol:

That's a good looking kit. I'm a tad bit jealous.

Re: Flickerfly's ORD Bot Hadron Build Log

PostPosted: Thu May 09, 2013 5:19 pm
by flickerfly
Just received my email from Panucatt that my shipping order was made. I guess those will enter the UPS system some time today.

I pre-ordered the SeeMeCNC EZStruder Extruder Kit. I'm probably overly impressed with the RostockMax so wanted to get something from them and that kit looks to be such a good intro price and I'm an easy sell when flexibility is high on the feature list. The one downside is that it won't ship until May 20th, but that'll be encouragment for me to make sure the mechanical platform is in great shape and wired up pretty. :lol:

Which reminds me, I realized last night that there are no holes drilled in ATI's extrusions for running the wires. I had no expectation one way or the other, but it seems worth recording that this is the case for someone looking for that information. I'll be looking to use the drill press at the hackerspace to resolve that since appearance and kid-proofing are priorities for me, but not until I have a good idea of where to drill.

Any tips on how to make the wiring hole location decisions? Mistakes to avoid?

Update: SeeMeCNC is shipping today so I must have just slipped in my order in time. They sent me an email saying it was on the way out the door.

Re: Flickerfly's ORD Bot Hadron Build Log

PostPosted: Thu May 09, 2013 5:38 pm
by flickerfly
TLHarrell wrote:Either your wife is really, really young looking, or you have a helper for putting together your project that will print a ton of Barbie stuff. Hope you've stocked up on pink filament. :lol:

That's a good looking kit. I'm a tad bit jealous.


Yeah, it looks beautiful. I should wax and buff it. My wife is also well cherished, but my 6yr old and I are building this together. She and I saved up for it and she's been talking about it for quite awhile, educating grandparents and the works. (I've observerd that people listen to her geek out more than me.) Doll house furniture is one of the many, many things on her list. I hope someone build a 3D design product appropriate for such young minds. Maybe we can do some playdough creations and use 123D Catch to make them digital. I haven't quite figured out how to help her engage the design part of 3D printing yet, but we're going to explore it.

Now taking donations of pink and purple plastic. ;)

Drilling location

PostPosted: Thu May 09, 2013 7:13 pm
by bdring
The top level assembly drawing shows the optional wire drilling locations on the second page.

http://www.buildlog.net/cnc_laser/erp/g ... ber=D30060

I was wrong, ATI was right

PostPosted: Thu May 09, 2013 8:02 pm
by flickerfly
bdring wrote:The top level assembly drawing shows the optional wire drilling locations on the second page.

http://www.buildlog.net/cnc_laser/erp/g ... ber=D30060


Thanks Bart!

Update on the missing ATI parts:
Apparently they aren't missing. I was working from the wrong list. The ATI shipping list doesn't include them and includes a few extra of the BHCSM508S screws. I finger tightened some of those in place quick and they seem to work so is my error in assumption.

Power Supply - Dumpster Diving Score

PostPosted: Fri May 10, 2013 4:50 am
by flickerfly
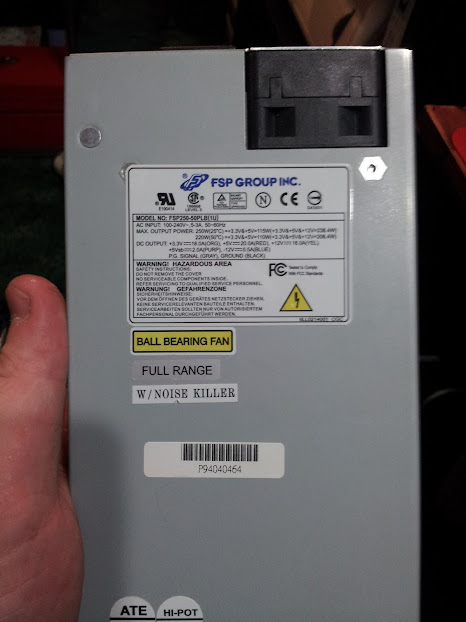
While it isn't a literal dumpster dive, but rather a nicely sorted hackerspace full of stuff, I found what I believe is an ideal power supply for the price of $0 in the MakeLehighValley cast-off pile. We have a big box of ATX power supplies. I was just walking by as a guy was emptying the box looking for a particular one and I saw this! It has 16A at 12V so I believe that is right where I've heard it needs to be. I'll have to look at the Azteeg X3 to see if it would help to bring the 5V up also to run the controller.
Image

While properly plugged in and the green power line jumped to ground, it comes up and hums nicely.

I've done power supply mods before and found them to be pretty easy. This thing has AC and a switch on the back and DC out the front. I'm thinking I may put a switch for power up front where the DC stuff is coming out now and look at running the 12V discreetly out the top and directly into the makerslide.

I also managed to basically get the platform standing. I feel confident that I can go through it with my daughter at this point without stopping and thinking a bunch and losing her attention as a result.

Image

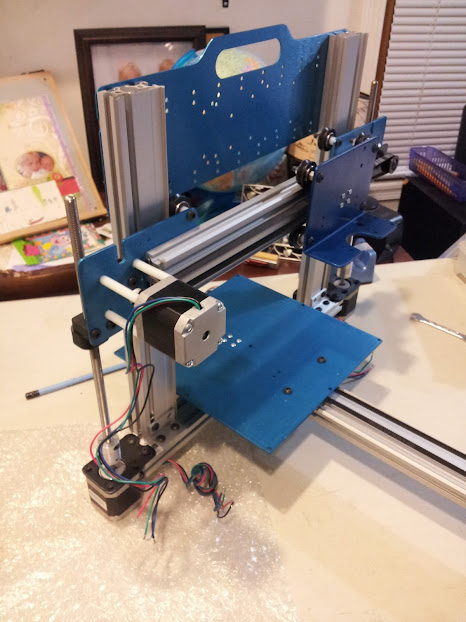
I was having some trouble with the bed carriage. It seems to move unevenly on the rail like there is a bump somewhere that I need to figure out. Any tips on where to look for this problem? I examined the V-wheels and the V-rails and they both seemed smooth to the eye. I'll give it all a more thorough look as I'm taking it apart I guess.

Re: Flickerfly's ORD Bot Hadron Build Log

PostPosted: Fri May 10, 2013 3:56 pm
by TLHarrell
On the Y-axis, pull off the belt.
If the problem goes away, it was the belt or motor.
If the problem remains and is cyclical, it's the wheels.
If the problem remains and is in only one spot, it's the rail.

Re: Flickerfly's ORD Bot Hadron Build Log

PostPosted: Fri May 10, 2013 6:03 pm
by flickerfly
Thanks, I did all that. It seems to be the wheels. I tried running them on another rail, but shorter and didn't notice it. I also ran each wheel separately against the rails and didn't notice it. One might be a little flatter in the point of the V maybe. I think I'll try swapping that with another one and try that.

Re: Flickerfly's ORD Bot Hadron Build Log

PostPosted: Fri May 10, 2013 7:25 pm
by bdring
No saying this is the problem, but....

The wheels should only be snug. If you over tighten you can put a flat on them. Sometimes the wheel will recover if you let it sit.

J-Head - still not available

PostPosted: Sat May 11, 2013 1:52 am
by flickerfly
Thanks Bart. I may have over-tightened then. I have it resting now. Otherwise, I'll just need to pickup a few spares I guess. I could see having more fun with this maker slide stuff some more so couldn't hurt to start building an inventory.

In other news, Hotends.com doesn't seem to have make any J-Head's available today, unless I missed the small window of availability.