Coasty the Coaster Toaster

Overview
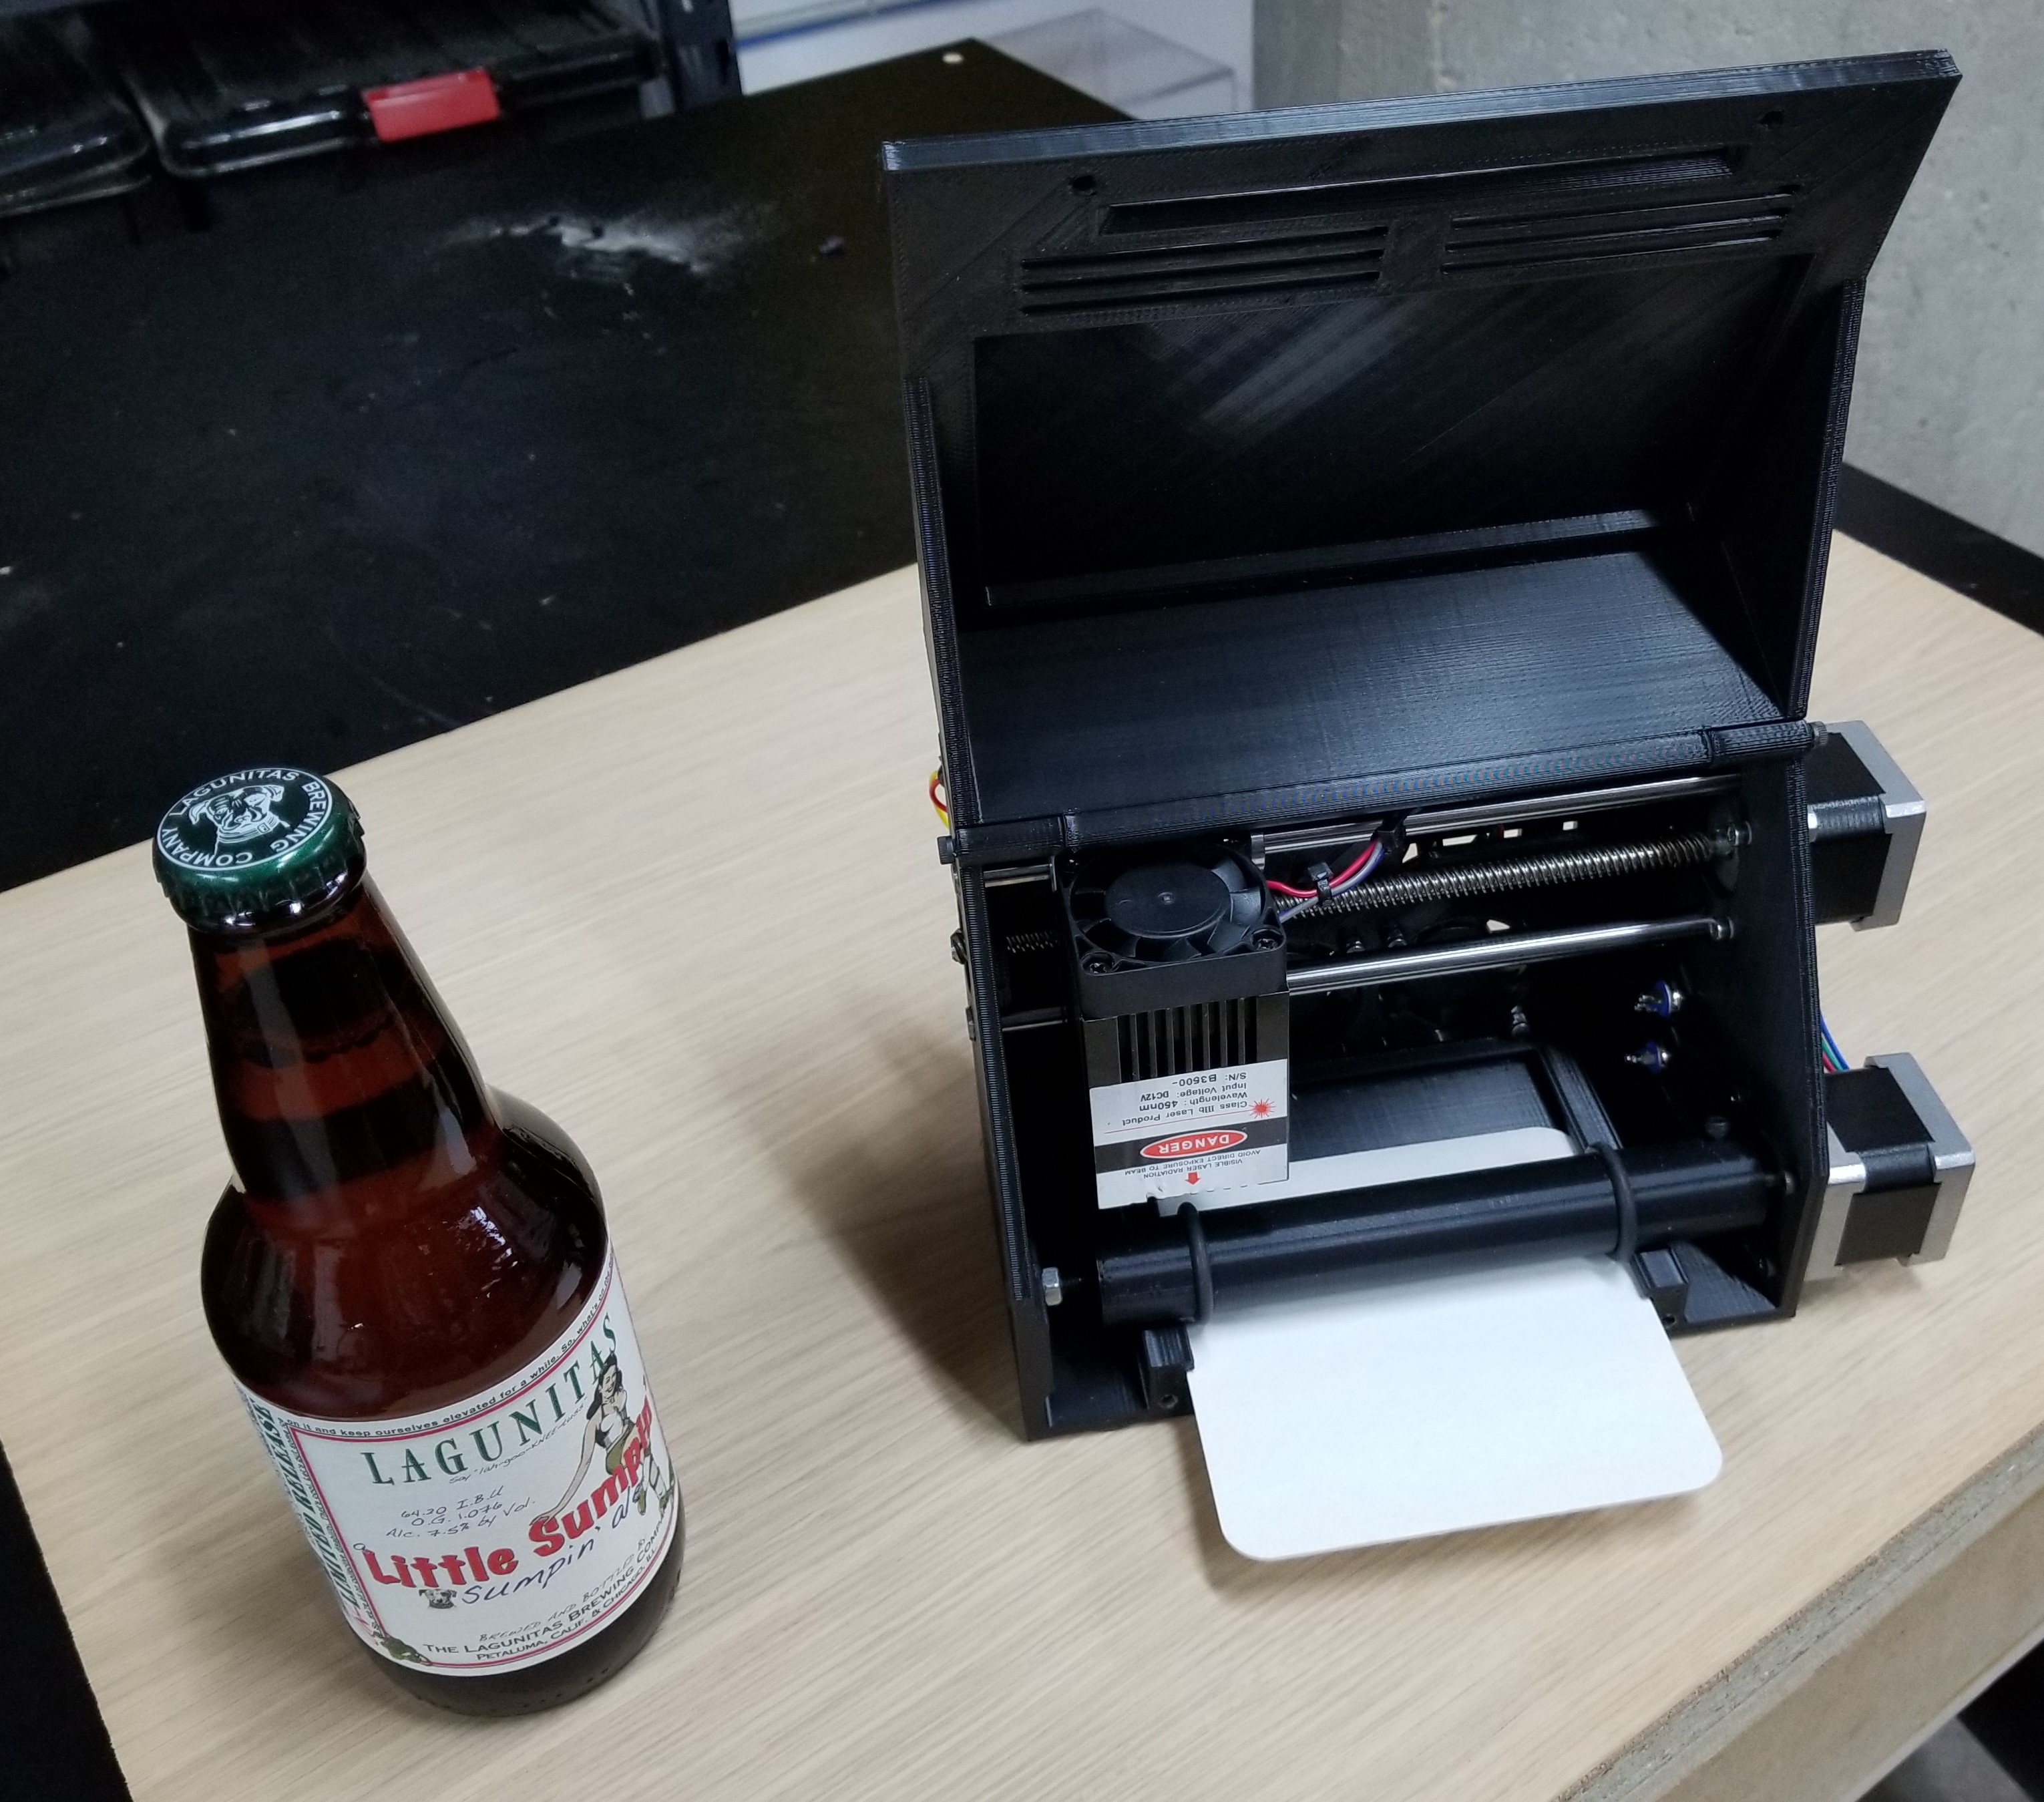
This is a just a silly little project that can only do one thing. It laser etches or cuts drink coasters.
I was interested in learning Grbl’s new laser features, so I bought a small laser module. We have a monthly-ish Hardware Happy Hour meetup in Chicago. We drink beer and show off our projects. My typical projects are big motion control/CNC stuff, so for the first few meetups, I could not bring anything. I challenged myself to design something interesting for each meetup. Here are my criteria…
- Must fit in a commuter sized backpack.
- Must be battery or USB powered.
- Can only scare the bar staff a little.
- Learn something new.
Parts
Most of my design choices were based on materials I had left over from other projects. The parts I needed to buy for this project were these…
- ($99) 3.5 watt / 2.5 watt continuous laser module with power supply
- ($26) Small 2 axis motion controller.
- ($9) A backlash resistant leadscrew nut. (small size/diameter was important)
- (($10 for 50) O-Rings for the drive wheels.


Enclosure
The enclosure is 3D printed in 2 parts. The chassis is quite complex, but prints easily without support. It should fit on most printers. It takes about 12 hours on my Taz 6. The second part is a simple hinged door.


X-Axis
The required width was hard too reduce too much. You are stuck with the width of the coaster and the width of the laser module. The beam is in the center of the module, so you need room for the rest of the laser module to fit within the width as it travels to the edges.
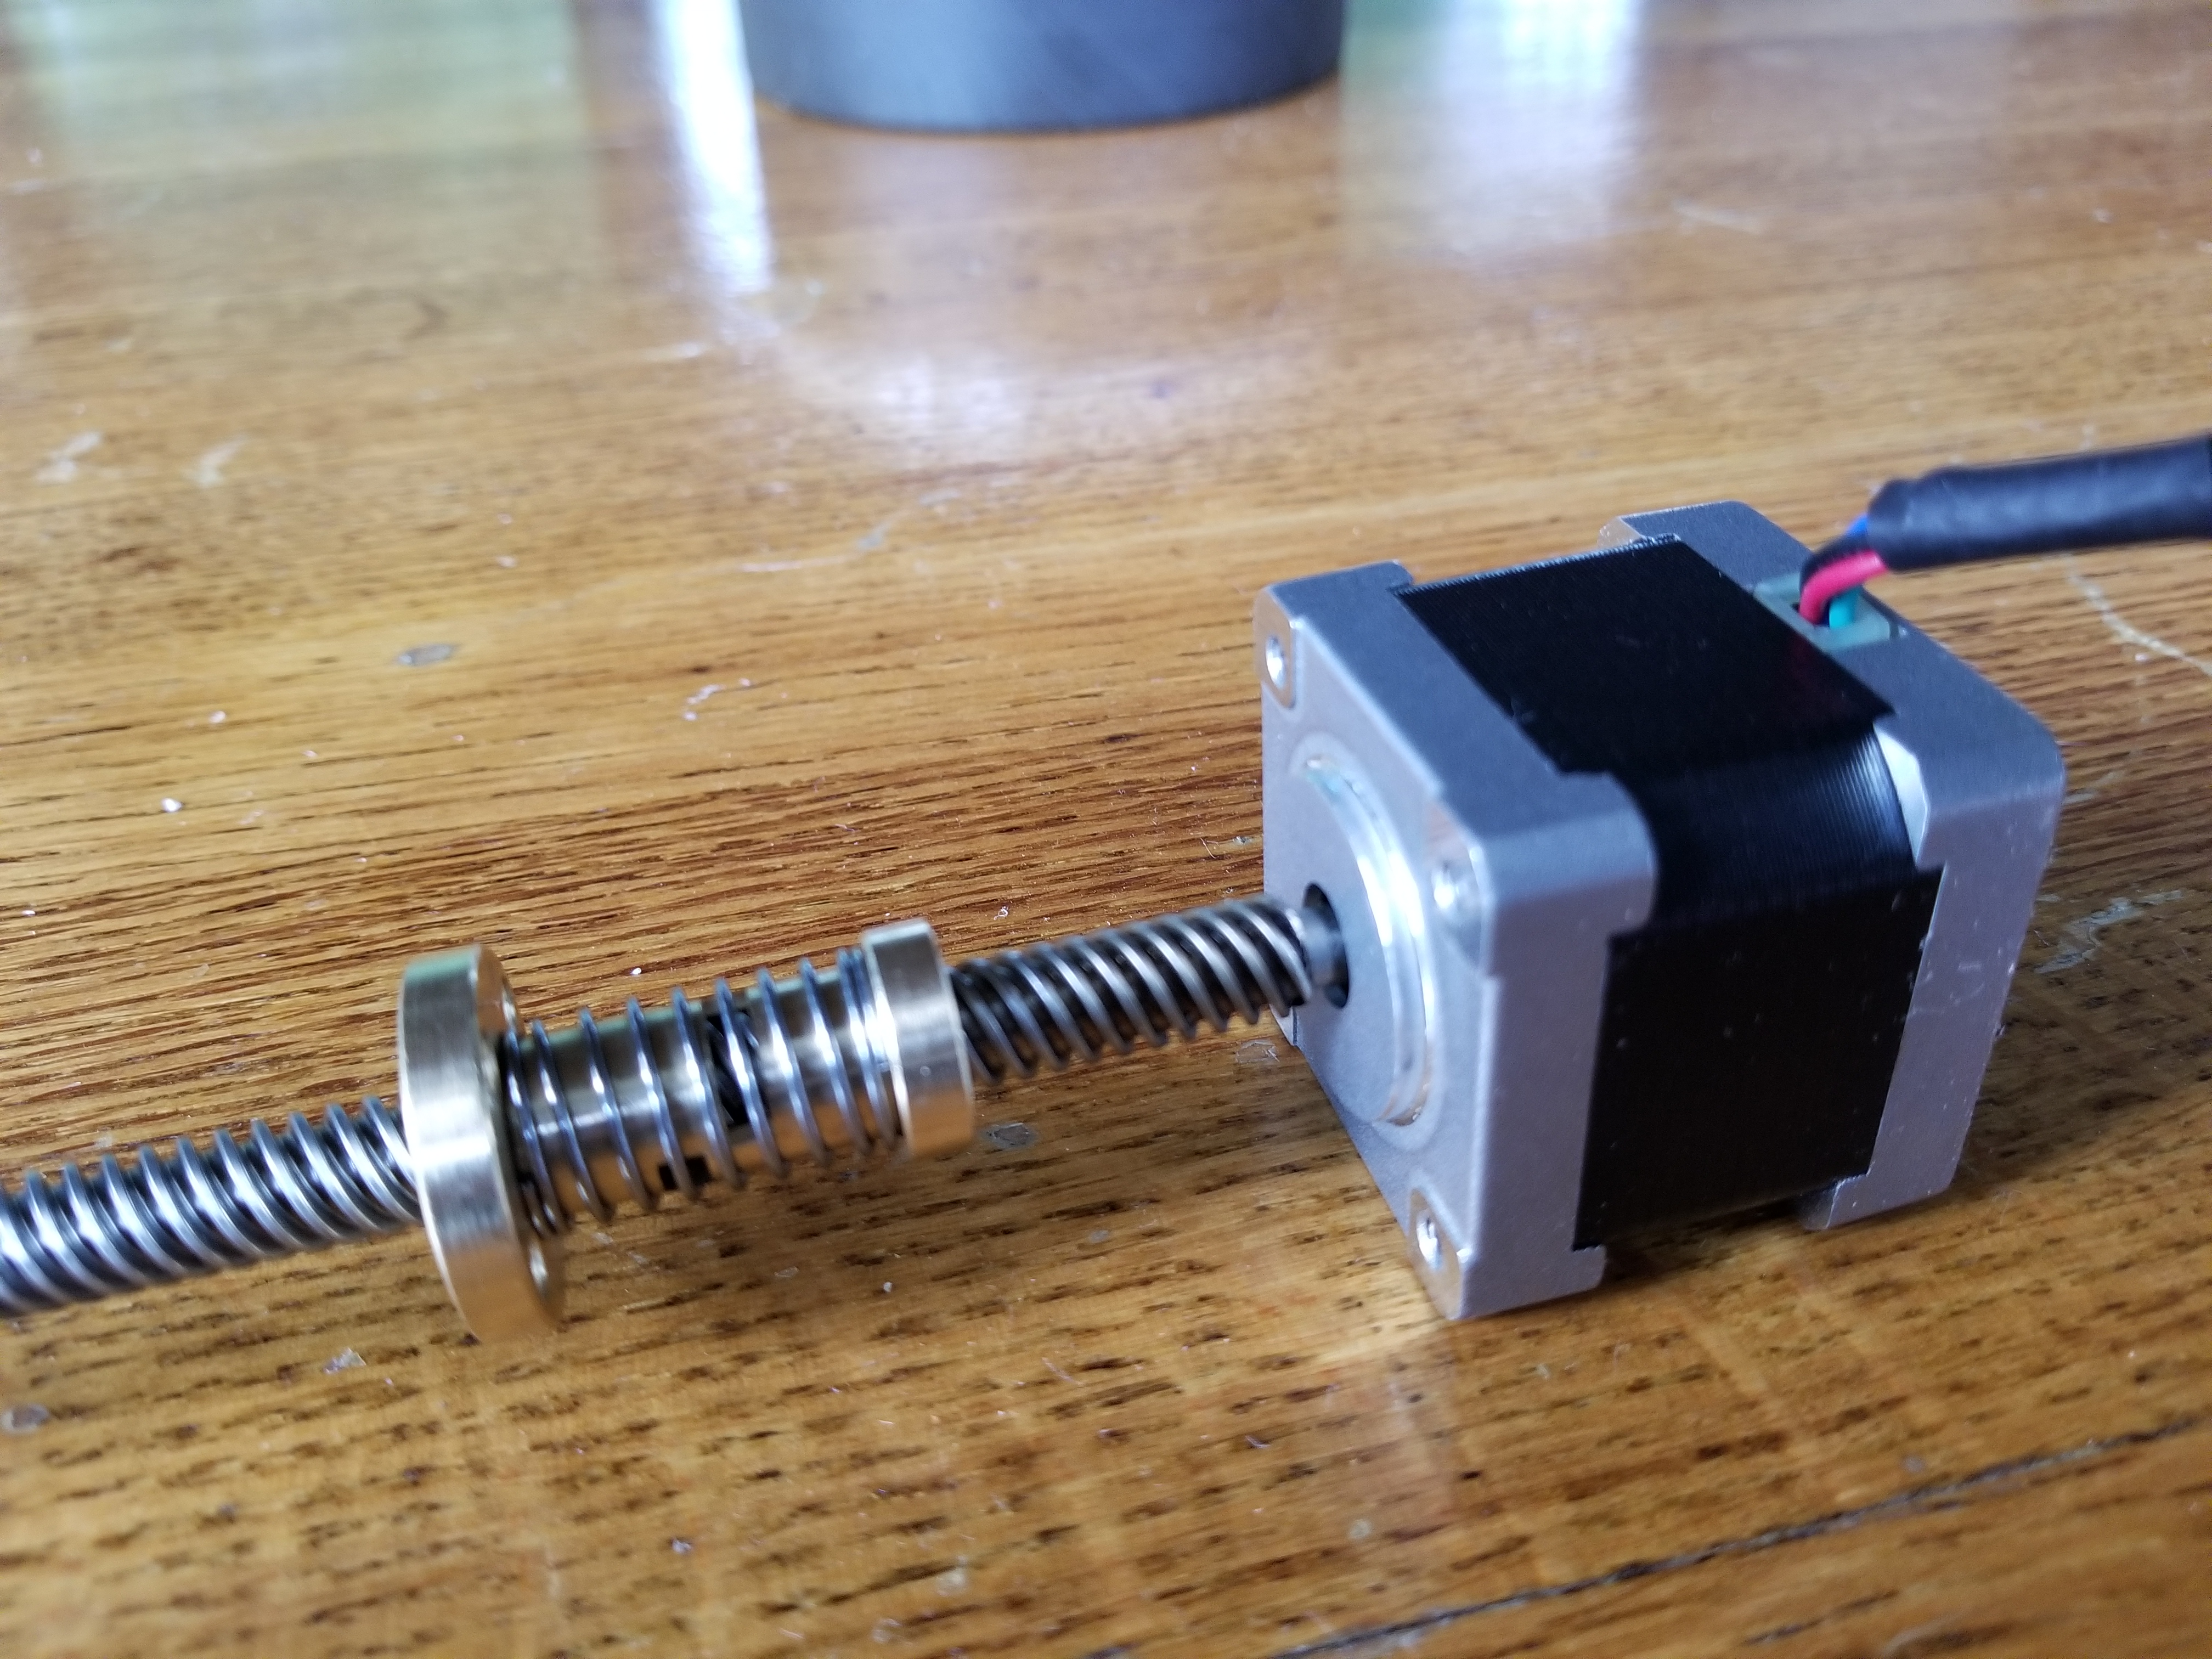
I tried the design with the motors inside the box with belts. Getting the motor pulley, the idler pulley and a belt attachment method into that minimum width was not working out well. I decided to use a Tr8-8 lead screw instead with the motor outside the case. A tr8-8 is pretty common and easy to buy. It is 8mm diameter it is 2 mm pitch with 4 starts (independent threads) so this will cause a travel of 8mm per turn.
The linear bearing uses (2) 8mm rods and 2 double wide ball bearings. The leadscrew attachment was a bit of a hack. I drilled a hole down the center of one end and epoxied it to the inserted motor shaft.

Y-Axis
The Y axis uses feed rollers to move the coaster. This allowed me to make the machine smaller in depth than the coaster. A 1″ O.D. x 1/8″ rubber oring is driven by a large axel. The coaster runs over some small bearings where it is pinched by the o-ring. The coaster slides over a large platform. This allows it to drag along cutouts pieces pretty well.


Z-Axis
The nice thing about limiting it to printing coasters is that you only need to deal with 2 axes. The focus length never changes. No Z provisions required.
Home Switches
Each axis has a home switch. The Y home switch is triggered by the top coaster as it slides in. The X home switch is triggered by an adjustable screw on the X carriage.


Electronics
I used a super cheap 2 axis CNC controller called the EleksMaker Mana SE. It uses 2 stepstick stepper drivers and a Arduino Nano. Both of those items were included in the price. It is designed to run Grbl for simple pen plotters, egg bots and lasers. It can control the laser via PWM and also has a servo connector. The board is not open source, so it was a little tricky to figure some things out. I’ll do some future posts about all the details.
I also added 2 fans. The laser generates a bit of smoke while cutting the coasters. The fans wisk it out the back.
I need to measure the current better, but the values below are a good estimate. The controller has a switch on the 12V that turns almost everything off, but the Arduino will stay on while plugged into USB. I typically turn off the 12V after each job. I want to make sure the laser never fires accidentally between jobs.
- 2 amps peak when cutting at full power
- 0.3 amps when idle.

Software
I tried several things, but ultimately settled on Laser Grbl. It is open source and quite simple. It is written in C#, so it is windows only. I was able to easily recompile it and try a few tweaks.
A full cut through job like the “Coasty COASTY” coaster takes about 4-5 minutes. I run at about 250mm/min for those. For bar use I think it is quicker just to do outline engraves. I run at about 1000-1200 mm/min for those and they typically take less than a minute. Full solid engraves are pretty smoky and take a long time.
Safety
I have no idea if this is safe, so I supervise its use pretty closely. The chassis and cover block direct viewing of the beam unless you really try to peer into some holes at sharp angles. The vents on the door angle so you can’t see through them. There is always the chance the coaster could catch fire, but that is not a lot of fuel. The cover is not interlocked, but it does bolt shut. Most DIY lasers like this are just run in the open.
Future
Here are some things I am thinking about.
- Add another row of drive wheels on the other side of the laser. This should increase the work area if the coaster transfers from one set to the other to get to the top and bottom edges. I would also like to reduce the diameter of them to make the machine a little smaller in depth.
- Cover the electronics. The electronics are a little vulnerable to damage and not quite ready to be tossed into a backpack.
- Add a filter to reduce the smoke smell. I bought a big sheet of carbon filter material. I would like to test it’s effectiveness.
- I would like to try some new ideas for a belt driven X axis. It would run faster and quieter. I think I could put the motor on the side like the Y motor. Currently drilling out the center of the TR8-8 leadscrew is requires a lathe.
- When cutting through something the laser energy has to be blocked by something. Right now there is a thin metal strip under the coaster where the beam goes. I would like to try moving the strip to the bottom of the device further away from the focal point. The beam would eventually cut a thin line through the enclosure until it hits the metal. The thinnest interruption in the base in best for dealing with cutout pieces. The beam will have some distance to diverge before bouncing off the metal.


Have you posted the files to build this somewhere or are you going to sell a kit?
Michael,
I am testing some updates to make the project more accessible as an open source project. See this post….
http://www.buildlog.net/blog/2017/08/coasty-update/
I will decide soon if I will make some kits.
Hi there! I know this is somewhat offf topicc but I was wondering which blog platform are
you using for this site? I’m getting sick and tijred of WordPress because I’ve had problems with
hackers and I’m looking at options for another platform.
I would be fantastic if you could point me in the direction of a good platform.
I use WordPress. I have not had hacker issues, but a few spams. I use the Akismet plugin o reduce the spam.