OrdBot Achievable print quality
Re: OrdBot Achievable print quality
![]() by butterfingers » Wed May 09, 2012 10:23 am
by butterfingers » Wed May 09, 2012 10:23 am
mhensen wrote:I have replaced the threaded rods with ACME leads and I am at this result.. Just a few minor tweaks need to be done..
May I ask where you sourced your lead screws?
- butterfingers
- Posts: 65
- Joined: Thu Feb 16, 2012 8:49 am
Re: OrdBot Achievable print quality
![]() by mhensen » Wed May 09, 2012 5:25 pm
by mhensen » Wed May 09, 2012 5:25 pm
- mhensen
- Posts: 45
- Joined: Wed Feb 15, 2012 5:57 pm
Re: OrdBot Achievable print quality
![]() by Digitalmagic » Wed May 09, 2012 6:50 pm
by Digitalmagic » Wed May 09, 2012 6:50 pm
mhensen wrote:This is hopefully an image that tells the 1000+ words
I have replaced the threaded rods with ACME leads and I am at this result.. Just a few minor tweaks need to be done..
Wouhaaaa! Exactly what I expect. Great result. Beautiful.
Would you describe your rig?
A vanilla RAMPS 1.4?
Your soft tool chain?
Slice thickness?
Human has 20 nail ... extruders.
- Digitalmagic
- Posts: 96
- Joined: Wed Apr 18, 2012 9:42 pm
Re: OrdBot Achievable print quality
![]() by WhiteB0rd » Wed May 09, 2012 10:48 pm
by WhiteB0rd » Wed May 09, 2012 10:48 pm
mhensen wrote:I got them from http://techpaladin.com/ initially for my prusa..
Now it is on my ORD..
Amazing. That's the kind of resolution I'm looking for.
I'd also be very interested in your toolchain, settings, etc., and if you're willing, some details and perhaps a picture of how you integrated the acme screw and nut into the carriage, ie, how did you mount the nut to the carriage?
WB
- WhiteB0rd
- Posts: 60
- Joined: Thu Feb 16, 2012 2:04 am
- Location: South Central PA, USA
Re: OrdBot Achievable print quality
![]() by mhensen » Thu May 10, 2012 7:46 pm
by mhensen » Thu May 10, 2012 7:46 pm
The toolchain is quite simple..
Sketchup or solidworks - save as STL
Slicer settings for me are .175 layer height and .3 infill
Pronterface
Hardware I run is the test version of the X1 Azteeg
The Acme Nut in my case is a cylinder so I took the original nut block and used the measures to create me a new block! That's the purpose of a 3d printer..
An image will come later.. I am redesigning as I am not satisfied!!!!
- mhensen
- Posts: 45
- Joined: Wed Feb 15, 2012 5:57 pm
Re: OrdBot Achievable print quality
![]() by mouritsen » Thu May 17, 2012 5:40 am
by mouritsen » Thu May 17, 2012 5:40 am
I am very curious to see how you attached your acme screws to your steppers. Also a picture of this acme nut you speak of would be very helpful. I think it's safe to say we would all like to be printing like this. What speed are you printing at. Any chance you could copy and paste your config.ini from slic3r?
Thanks, and good work.
Thanks, and good work.
- mouritsen
- Posts: 10
- Joined: Tue Feb 14, 2012 8:38 pm
Re: OrdBot Achievable print quality
![]() by mouritsen » Thu May 17, 2012 5:42 am
by mouritsen » Thu May 17, 2012 5:42 am
@mhensen - Hey, I also just noticed you have something I need/want. I have the j-head hot end too and I wanted to raise my extruder up just like you have done. Do you have a file I could use to print the same piece?
thanks, again.
Steve
thanks, again.
Steve
- mouritsen
- Posts: 10
- Joined: Tue Feb 14, 2012 8:38 pm
Re: OrdBot Achievable print quality
![]() by mhensen » Thu May 17, 2012 1:21 pm
by mhensen » Thu May 17, 2012 1:21 pm
ok .. Here we go.
an image of the acme nut.. ( have a round cylinder instead of a nut..)
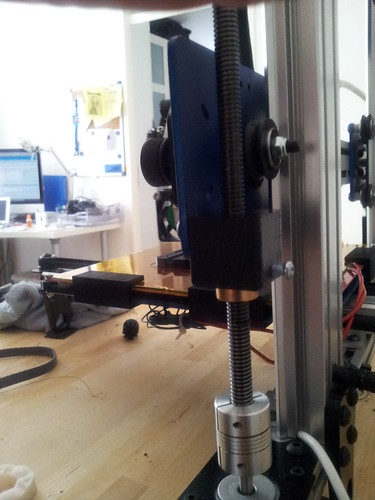
Overall view .. then you see the 'nut block' is lower than the x-axis plate.. this to preserve height..
the extruder is bait blurry but that is because it is printing right now
as you might notice .. I am running with the motor on the right..
To print it it is just a matter of switching you x-axis, switch it either in firmware or just rotate the connector, (POWER OFF FIRST) to have 0 on the other side of your printed and run reverse,..
You just need to stop it manually by holding the stop closed as soon as you start the print. Print it and it is inverted no need to mirror an stl file
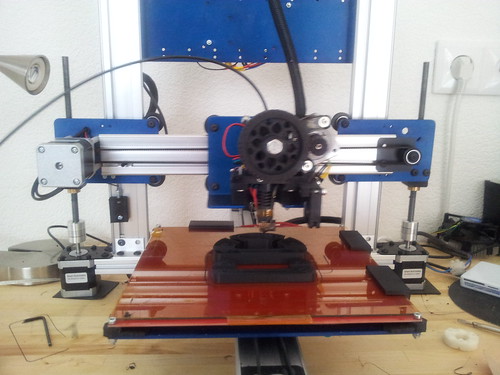
If anybody is wondering what the small blackblock on the left is .. it is my way to make the adjustments to the z-0 height tuning easier
The stls for the nut block and the extruder plate are attached..
Config.ini
I have my perimeters pretty low as this is the outside of the object.. the infill can be higher, even higher as I have right now..But all is pretty basic!
Mind that I use a .35 extruder, in the case of a .5 extruder put the layer height at 0.2 or .25 and the prints are almost as nice!!!!
I hope it helps
acceleration = 0
bed_size = 200,200
bed_temperature = 0
bottom_layer_speed_ratio = 0.3
bridge_fan_speed = 100
bridge_flow_ratio = 1
bridge_speed = 60
cooling =
disable_fan_first_layers = 1
duplicate = 1
duplicate_distance = 6
duplicate_grid = 1,1
end_gcode = G1 X12.0 F4000 ; home (almost) x - stops extruder crashing into frame if at very top of Z height\nG1 Y170 F4000 ; move the print to the front.\nM104 S0 ; make sure the extuder is turned off.\nM140 S0 ; make sure the bed is turned off.\nM84
extrusion_axis = E
extrusion_multiplier = 1
extrusion_width_ratio = 0
fan_always_on = 0
fan_below_layer_time = 60
filament_diameter = 3
fill_angle = 45
fill_density = 0.25
fill_pattern = rectilinear
first_layer_bed_temperature = 0
first_layer_height_ratio = 1
first_layer_temperature = 250
g0 = 0
gcode_arcs = 0
gcode_comments = 0
gcode_flavor = reprap
infill_acceleration = 50
infill_every_layers = 1
infill_speed = 95
layer_gcode =
layer_height = 0.175
max_fan_speed = 100
min_fan_speed = 35
min_print_speed = 10
notes =
nozzle_diameter = 0.35
output_filename_format = [input_filename_base].gcode
perimeter_acceleration = 25
perimeter_speed = 50
perimeters = 3
post_process =
print_center = 100,100
retract_before_travel = 2
retract_length = 1
retract_lift = 0.35
retract_restart_extra = 0
retract_speed = 30
rotate = 0
scale = 1
skirt_distance = 6
skirt_height = 1
skirts = 1
slowdown_below_layer_time = 15
small_perimeter_speed = 35
solid_fill_pattern = rectilinear
solid_infill_speed = 80
solid_layers = 3
start_gcode = G28 ; home all axes\nG92 E0 ;reset extruder\nG1 E3 F1200 ;Prime extruder 3mm\nG1 E2 F1200 ;retract extruder 1mm\nG92 E0 ;reset extruder
support_material = 0
support_material_tool = 0
temperature = 250
travel_speed = 200
use_relative_e_distances = 0
z_offset = 0
an image of the acme nut.. ( have a round cylinder instead of a nut..)
Overall view .. then you see the 'nut block' is lower than the x-axis plate.. this to preserve height..
the extruder is bait blurry but that is because it is printing right now
as you might notice .. I am running with the motor on the right..
To print it it is just a matter of switching you x-axis, switch it either in firmware or just rotate the connector, (POWER OFF FIRST) to have 0 on the other side of your printed and run reverse,..
You just need to stop it manually by holding the stop closed as soon as you start the print. Print it and it is inverted
If anybody is wondering what the small blackblock on the left is .. it is my way to make the adjustments to the z-0 height tuning easier
The stls for the nut block and the extruder plate are attached..
 newNut.STL.zip
- nutblock acme
- (23.75 KiB) Downloaded 1137 times
- extruderplate.STL.zip
- extruder plate for j-head raised platform
- (179.25 KiB) Downloaded 1077 times
Config.ini
I have my perimeters pretty low as this is the outside of the object.. the infill can be higher, even higher as I have right now..But all is pretty basic!
Mind that I use a .35 extruder, in the case of a .5 extruder put the layer height at 0.2 or .25 and the prints are almost as nice!!!!
I hope it helps
acceleration = 0
bed_size = 200,200
bed_temperature = 0
bottom_layer_speed_ratio = 0.3
bridge_fan_speed = 100
bridge_flow_ratio = 1
bridge_speed = 60
cooling =
disable_fan_first_layers = 1
duplicate = 1
duplicate_distance = 6
duplicate_grid = 1,1
end_gcode = G1 X12.0 F4000 ; home (almost) x - stops extruder crashing into frame if at very top of Z height\nG1 Y170 F4000 ; move the print to the front.\nM104 S0 ; make sure the extuder is turned off.\nM140 S0 ; make sure the bed is turned off.\nM84
extrusion_axis = E
extrusion_multiplier = 1
extrusion_width_ratio = 0
fan_always_on = 0
fan_below_layer_time = 60
filament_diameter = 3
fill_angle = 45
fill_density = 0.25
fill_pattern = rectilinear
first_layer_bed_temperature = 0
first_layer_height_ratio = 1
first_layer_temperature = 250
g0 = 0
gcode_arcs = 0
gcode_comments = 0
gcode_flavor = reprap
infill_acceleration = 50
infill_every_layers = 1
infill_speed = 95
layer_gcode =
layer_height = 0.175
max_fan_speed = 100
min_fan_speed = 35
min_print_speed = 10
notes =
nozzle_diameter = 0.35
output_filename_format = [input_filename_base].gcode
perimeter_acceleration = 25
perimeter_speed = 50
perimeters = 3
post_process =
print_center = 100,100
retract_before_travel = 2
retract_length = 1
retract_lift = 0.35
retract_restart_extra = 0
retract_speed = 30
rotate = 0
scale = 1
skirt_distance = 6
skirt_height = 1
skirts = 1
slowdown_below_layer_time = 15
small_perimeter_speed = 35
solid_fill_pattern = rectilinear
solid_infill_speed = 80
solid_layers = 3
start_gcode = G28 ; home all axes\nG92 E0 ;reset extruder\nG1 E3 F1200 ;Prime extruder 3mm\nG1 E2 F1200 ;retract extruder 1mm\nG92 E0 ;reset extruder
support_material = 0
support_material_tool = 0
temperature = 250
travel_speed = 200
use_relative_e_distances = 0
z_offset = 0
- mhensen
- Posts: 45
- Joined: Wed Feb 15, 2012 5:57 pm
Re: OrdBot Achievable print quality
![]() by mhensen » Thu May 17, 2012 2:09 pm
by mhensen » Thu May 17, 2012 2:09 pm
One other thing for the ones that hade a wobble in the Z-axis is to have the offset nuts quite tight. Give it just enough space that the z-axis motors can push and pull without slipping/skipping. Then loosen the motor mount screws just a bit that the motor mount can slide a bit..
this should help preventing the axis ribbles in you prints..
It is just a suggestion.. I had it running this way before switching to the acme threads..and it made my prints better..Just give it a go .. you can always revert back
This is what we did on the prusa to. the z-motors on top where just laying there with the screws just to hold it in to place but not tight so the motor could move with the wobble a tiny bit
- mhensen
- Posts: 45
- Joined: Wed Feb 15, 2012 5:57 pm
Re: OrdBot Achievable print quality
![]() by mouritsen » Tue May 22, 2012 6:10 am
by mouritsen » Tue May 22, 2012 6:10 am
Thanks, I really appreciate you sharing that with us. My threaded rods and couplers came today. I got threaded nuts, so I've got to figure out how to integrate those into the printer without introducing slop. I was thinking about making a mold of the delrin pieces that come with the ordbot and then casting the nuts in the mold with resin while using the threaded rod as a guide to keep it straight while it sets. If it works I'll put something up here showing it. I'm going to print your raised extruder plate and try some of your settings. Thanks again.
Steve
Steve
- mouritsen
- Posts: 10
- Joined: Tue Feb 14, 2012 8:38 pm
Who is online
Users browsing this forum: No registered users and 19 guests